On this page
- The good news?
- Where to Apply Eyeshadow: Know Your Eye Map
- The Only Brushes You Need for Beginner Eyeshadow
- Is It Better to Apply Eyeshadow with a Brush or Finger?
- Should You Wet Your Brush Before Applying Eyeshadow?
- Eyeshadow Types: Which One Works Best for Beginners
- Easy Eyeshadow Tutorial: Step-by-Step with 3 Colors
- What you’ll need
- Step 1: Prime your eyelids
- Step 2: Apply a base shade all over
- Step 3: Blend a transition shade into the crease
- Step 4: Add depth to the outer corner
- Step 5: Pack color onto the lid
- Step 6: Highlight the inner corner and brow bone
- Step 7: Finish with eyeliner and mascara
- Should You Apply Dark or Light Eyeshadow First?
- Simple One-Color Eyeshadow Look
- Natural Neutral Eyeshadow Look for Beginners
- Soft Smokey Eye for Beginners
- Should You Apply Eyeshadow Underneath Your Eye?
- Eyeshadow Tips for Hooded Eyes
- Which Eyeshadow Colors Work Best for Your Eye Color
- 5 Beginner Eyeshadow Mistakes to Avoid
- Taking Your Eyeshadow Skills Further
- Frequently Asked Questions
- How do I apply eyeshadow for beginners step by step?
- Can I use just one eyeshadow color?
- Should I apply dark or light eyeshadow first?
- How do I stop my eyeshadow from creasing?
- How do I apply eyeshadow with hooded eyes?
- What’s the best eyeshadow palette for a complete beginner?
- Should I wet my eyeshadow brush?
- Is eyeshadow safe for teen skin?
- How far up should eyeshadow go?
- Where should I apply eyeshadow for beginners?
Eyeshadow is the one product that makes beginners freeze up more than anything else. You open a palette, see twelve colors staring back at you, and suddenly a single swipe of lip gloss sounds a lot more appealing.
The good news?
You only need to learn one core technique to handle any eyeshadow palette, any color combination, and any occasion — from a subtle everyday look for school to soft evening glam.
This beginner eyeshadow tutorial breaks the process into clear, repeatable steps. You’ll learn exactly where each shade goes, which brushes actually matter, and how to blend without turning your lids into a muddy mess. No prior experience needed.
Where to Apply Eyeshadow: Know Your Eye Map
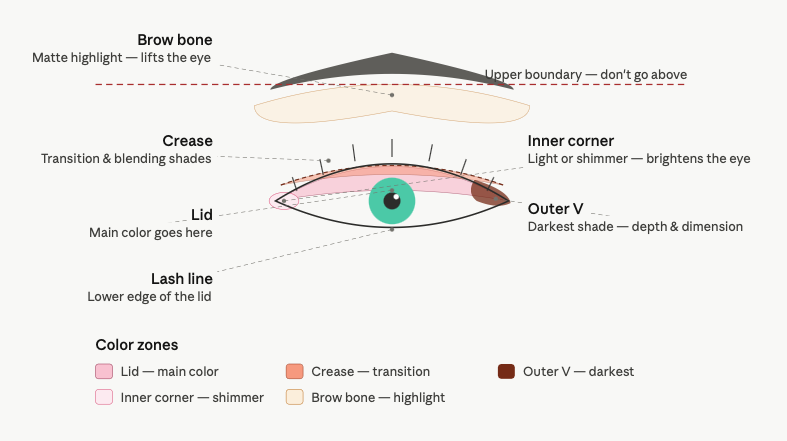
Before you pick up a single brush, you need to know where things go. Every eyeshadow tutorial references these five zones — once you memorize them, instructions suddenly make sense.
The lid — the large, flat area between your lash line and the crease. This is where your main color goes. When you close your eye and touch your eyelid, that’s it.
The crease — the curved line where your lid folds when your eye is open. Run your finger from the outer corner of your eye upward along your brow bone until you feel the dip — that’s the crease. Transition and blending shades live here.
The outer corner (outer V) — where your upper and lower lash lines meet at the outside edge of your eye. Darker shades go here to add depth and dimension.
The inner corner — the area closest to your nose. A light or shimmery shade here instantly makes your eyes look brighter and more awake.
The brow bone — the area just below your eyebrow. A matte highlight here lifts the whole eye area.
How far up should eyeshadow go? Your eyeshadow should never extend above the brow bone. The transition shade in the crease can drift slightly above the natural fold — especially if you have hooded eyes — but the brow bone highlight is your upper boundary. Anything higher looks unintentional.
The Only Brushes You Need for Beginner Eyeshadow
You don’t need a 15-piece brush set. Three brushes cover every eyeshadow application:
A flat shader brush — for packing color onto the lid. The flat, dense shape picks up pigment and deposits it exactly where you want it without fallout.

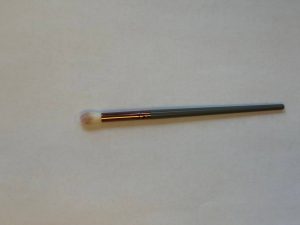
A fluffy blending brush — for the crease and blending. This one should be soft, tapered, and slightly larger than the shader. You’ll use it in windshield-wiper motions to diffuse color so there are no harsh lines. A good fluffy brush is the single most important tool in this entire tutorial.
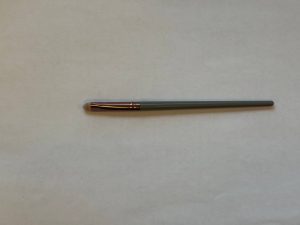
A small pencil brush — for the outer V, lower lash line, and detail work. The pointed tip gives you precision in tight areas.
Is It Better to Apply Eyeshadow with a Brush or Finger?

Both work — it depends on the formula. For powder eyeshadow, brushes give you more control and cleaner blending. For cream and stick eyeshadows, your fingertip warmth actually helps the product melt into the skin for a smooth, natural finish. Many pro makeup artists use fingers for one-color cream looks and switch to brushes when building multi-shade powder looks.
Should You Wet Your Brush Before Applying Eyeshadow?
For most everyday eyeshadow looks — no. A dry brush with powder shadow gives you a soft, buildable finish that’s easy to blend. However, wetting your flat shader brush (or using a setting spray on it) before dipping into a shimmer shade creates a more intense, foil-like payoff on the lid. This is called “foiling” and it’s a useful trick once you’re comfortable with the basics, but skip it while you’re still learning to blend.
Eyeshadow Types: Which One Works Best for Beginners
Powder eyeshadow is the most common format and what most tutorials reference. It comes in palettes and singles, it’s blendable, buildable, and available in every color. This is the best starting point for learning technique because you can control the intensity — start light, add more.
Cream eyeshadow comes in pots or compact palettes and applies with fingers or a flat brush. It blends easily, gives a soft natural finish, and works beautifully for simple one-shade looks.
Eyeshadow sticks are the easiest grab-and-go option. Swipe across your lid, blend with a finger, done. Perfect for school mornings when you have two minutes.
Liquid and glitter eyeshadow are best saved until you’re comfortable with the basics. They require more precision and don’t blend the same way as powder or cream formulas.
Easy Eyeshadow Tutorial: Step-by-Step with 3 Colors
This is the classic three-shade technique that every makeup artist learns first. Once you master this beginner eyeshadow look, you can recreate it with any palette, any color family, any vibe.
What you’ll need
- An eyeshadow palette with at least three shades: one light (base), one medium (transition), and one slightly darker (depth)
- Your three brushes (flat shader, fluffy blending, pencil)
- Eyeshadow primer or concealer
Step 1: Prime your eyelids
A thin layer of eyeshadow primer — or a dab of concealer — creates a smooth, slightly tacky surface. This helps eyeshadow adhere, appear more vibrant, and last without creasing throughout the day.
Blend a small amount across your entire lid up to the brow bone using your ring finger. Wait ten seconds for it to set before you apply eyeshadow.
Step 2: Apply a base shade all over
Pick the lightest, most neutral shade in your palette — typically a matte beige or soft ivory. Using your flat shader brush, sweep it across the entire lid from lash line to brow bone.
This evens out the color of your eyelid (most people have slight veining or discoloration) and creates a smooth canvas that helps other shades blend more easily.
Step 3: Blend a transition shade into the crease
Pick a medium-toned matte shade — a warm brown, soft taupe, or muted peach work well for a natural everyday look. Load it onto your fluffy blending brush, tap off the excess, then close your eye and apply the color back and forth through the crease using small windshield-wiper motions.
Keep it above the crease, not on the lid. You’re creating a soft gradient that acts as a bridge between your lid color and your skin. There should be no harsh lines — just a gentle wash of warmth.
Start with very little product. You can always add more, but removing excess is much harder.
Step 4: Add depth to the outer corner
Switch to your pencil brush and pick up the darkest shade — still nothing extreme, just a step deeper than your transition color. Place it in the outer V, the triangular area where your upper crease meets the outer edge of your lash line.
Use small pressing motions to concentrate the color here. Then take your clean fluffy brush and blend the edges inward so the darker shade melts seamlessly into the transition shade.
Step 5: Pack color onto the lid
Choose your lid shade — for a simple look, a subtle shimmer or soft satin finish works beautifully. Using your flat shader brush, pat (don’t swipe) the color onto the center of your lid, then work outward toward the inner and outer corners.
Patting is the secret to rich, vibrant color payoff. Swiping pushes the pigment around instead of depositing it.
Step 6: Highlight the inner corner and brow bone
Take a light shimmer or matte ivory shade. Dab a small amount into the inner corner of your eye — this instantly brightens the eye area. Then apply a touch along the brow bone just below the arch of your eyebrow.
These two small highlights make your entire eye look bigger, more lifted, and more awake.
Step 7: Finish with eyeliner and mascara
A thin line of brown or black eyeliner along your upper lash line defines the eyes without overpowering the shadow work. One or two coats of mascara completes the look. For a more natural result, use brown mascara and skip the lower lash line.
Should You Apply Dark or Light Eyeshadow First?
Light eyeshadow goes on first. Here’s why: when you apply the base shade first and then layer the transition and darker shades on top, each layer blends into the one beneath it. This creates a smooth, seamless gradient from light to dark.
If you start with a dark shade and try to blend lighter shades into it, the dark pigment drags into areas where you don’t want it, and the result looks muddy. The light-to-dark rule applies to every eyeshadow technique — from a simple three-color look to a dramatic smokey eye.
Warning
Don’t start with dark shades. Light goes first, always. Once dark pigment is on the lid it’s very hard to blend away without smearing.
Tip
Start with very little product on the brush. You can always add more, but removing excess eyeshadow from the lid is much harder than building it up layer by layer.
Simple One-Color Eyeshadow Look
Don’t have time for the full tutorial? A single eyeshadow color — applied correctly — is a complete look.
Pick a single matte or satin shade (champagne, warm taupe, and soft rose work on almost everyone). Using your flat brush or your finger, apply it across the entire lid. Then use your blending brush to softly diffuse the edges upward into the crease so there’s no harsh stopping point.
One shade, two minutes, and it looks polished. Add mascara and you’re done. This is the easiest everyday eyeshadow look for school or errands.
Natural Neutral Eyeshadow Look for Beginners
The natural everyday look keeps everything soft and barely there — think “my eyes just naturally look this defined.”
- Use a matte neutral shade one tone darker than your skin as your only crease color — blend well
- Apply a light satin or matte shade across the lid
- Dab a touch of shimmer highlight in the inner corner
- Thin line of brown eyeliner on the upper lash line (optional)
- One coat of brown mascara
Total time: 3–4 minutes. Nobody will know you’re wearing eyeshadow — they’ll just think your eyes look great. This simple everyday look is perfect for school, casual hangouts, or any day you want to look put-together without looking “done.”
Soft Smokey Eye for Beginners
A smokey eye sounds intimidating, but the beginner version is just a more dramatic take on the same three-shade technique.
The difference: you use deeper colors (charcoal, dark brown, deep plum instead of medium-toned neutrals) and blend more aggressively in the crease for that signature diffused, smoky effect.
Tips for an easy smokey eye:
Start with dark brown, not black. Brown is far more forgiving to blend and still creates a beautifully smoky look.
Build up gradually. Apply a thin layer, blend, then add more. Three thin layers with blending between each give a cleaner result than one heavy application.
Smudge a bit of the dark shade along your upper lash line with the pencil brush — this creates the smoky connection between shadow and lashes.
Finish with black eyeliner smudged into the upper lash line and two coats of volumizing mascara. Clean up any fallout under your eyes with a damp cotton swab.
Should You Apply Eyeshadow Underneath Your Eye?
A small amount of eyeshadow on the lower lash line can look beautiful — it connects the upper and lower eye for a more cohesive, polished look. But there’s a right way and a wrong way.
Do: Use your pencil brush with a bit of the transition shade and gently run it along the outer half of your lower lash line. Keep it thin and blend the edges.
Don’t: Apply dark shadow all the way across the lower lash line or pack it on heavily. On younger skin especially, too much shadow underneath the eye looks muddy and can make you appear tired — the opposite of what you’re going for.
For everyday and school looks, skipping the lower lash line entirely is perfectly fine.
Eyeshadow Tips for Hooded Eyes
Hooded eyes have a fold of skin that partially or fully covers the crease when your eyes are open. This is extremely common and doesn’t mean eyeshadow won’t work for you — you just adjust placement.
Note
If you have hooded eyes, apply your crease shade with your eyes open so you can see exactly where the color lands above the hood. Blending with eyes closed hides the shape and usually means re-doing the look.
Apply your crease shade with eyes open. When you close your eye to apply color, the fold hides your work. Instead, look straight into a mirror and mark where you want the transition shade to be visible, then close your eye to blend.
Place the transition shade slightly above your natural crease. This ensures the color actually shows when your eyes are open.
Stick to matte shades in the crease. Shimmer on the fold can draw attention to it. Save shimmer for the center of the lid where it catches light beautifully.
Use a smaller blending brush. A compact fluffy brush gives you more control in a tighter space.
Which Eyeshadow Colors Work Best for Your Eye Color
You can wear any color you want — there are no rules. But certain shades create contrast that makes specific eye colors appear more vivid:
Brown eyes — the most versatile. Warm golds, bronzes, plums, and greens all enhance brown eyes. You can also pull off bold jewel tones like emerald and sapphire.
Blue eyes — warm-toned shades create the strongest contrast. Peach, copper, warm brown, and burnt orange make blue eyes pop. Avoid cool-toned blues that match your iris — they wash it out.
Green eyes — purple and plum shades are the classic pairing. Mauve, burgundy, warm pinks, and reddish browns all bring out the green. Gold and bronze also work beautifully.
Hazel eyes — you get the best of both. Earthy tones (warm brown, khaki, gold) bring out the green flecks, while plum and purple highlight the brown. Copper is especially flattering on hazel eyes.
5 Beginner Eyeshadow Mistakes to Avoid
Skipping the base shade. Without that initial light shade to even out your lid, other colors look patchy and sit unevenly.
Using too much product. Load the brush, tap off excess, then apply. This single habit will immediately improve your eyeshadow application.
Not blending enough. Spend at least 20–30 seconds per eye just blending with a clean fluffy brush. Blending is what separates “I put color on my lid” from “that looks like a pro did it.”
Going too dark too fast. Apply your lightest shade first and build toward darker tones. Dark shadow applied first is nearly impossible to rescue.
Ignoring fallout. Some powder shadows drop loose pigment onto your cheeks. Either do your eye makeup before your base makeup, or hold a tissue under your eye while applying shadow to catch the fallout.
Taking Your Eyeshadow Skills Further
Once you’re comfortable with the three-shade technique, you’ve built the foundation for every eyeshadow look — soft glam, cut crease, halo eyes, and bold color are all variations of the same placement logic.
If you want structured practice, an online makeup course designed for teens walks you through these techniques with step-by-step video demonstrations, from basic eyeshadow application through to complete looks for school, events, and everyday life. A good course builds skills progressively so each new technique feels natural, not overwhelming.
Frequently Asked Questions
How do I apply eyeshadow for beginners step by step?
Start by priming your lids, then apply a light base shade all over. Blend a medium matte shade into the crease with a fluffy brush. Add a slightly darker shade to the outer corner. Pat your main color onto the lid. Finish with a highlight on the inner corner and brow bone, then add eyeliner and mascara.
Can I use just one eyeshadow color?
Yes — a single shade across the lid, blended softly at the edges, is a complete look. Champagne, taupe, and soft rose are especially flattering as single-shade options. This is the easiest everyday approach and takes under two minutes.
Should I apply dark or light eyeshadow first?
Always apply light shades first and build toward darker tones. Light-to-dark layering creates a smooth, seamless gradient. Starting dark makes the color drag into areas where you don’t want it, resulting in a muddy look.
How do I stop my eyeshadow from creasing?
An eyeshadow primer creates a barrier between your skin’s natural oils and the product. If you don’t have primer, a thin layer of concealer set with translucent powder does the same job. This is especially important if you have oily eyelids.
How do I apply eyeshadow with hooded eyes?
Apply your crease shade with your eyes open so you can see where the color sits. Place the transition shade slightly above your natural crease. Use matte shades in the crease and save shimmer for the center of the lid.
What’s the best eyeshadow palette for a complete beginner?
Look for a small palette with 6–9 shades — a mix of matte and shimmer neutrals. Warm browns, taupes, and a couple of shimmer shades teach you placement and blending without the challenge of working with bold color.
Should I wet my eyeshadow brush?
For everyday looks, use a dry brush — it gives a soft, buildable finish. Wetting a flat shader brush before applying shimmer creates a more intense, foil-like effect. This is a useful technique once you’re comfortable with the basics.
Is eyeshadow safe for teen skin?
Eyeshadow is safe for teens as long as you use non-expired products and remove your makeup thoroughly at the end of the day. Avoid sharing eyeshadow or brushes with others, and clean your brushes regularly to prevent bacteria buildup.
How far up should eyeshadow go?
Your eyeshadow should extend from the lash line up to the brow bone but never above it. The brow bone highlight marks your upper boundary. Your transition shade in the crease can sit slightly above the natural fold, especially on hooded eyes, but the brow bone is the limit.
Where should I apply eyeshadow for beginners?
Focus on three zones: the lid (your main color), the crease (a matte transition shade for blending and depth), and the inner corner (a light highlight to brighten). The outer corner gets a slightly darker shade for dimension, and the brow bone gets a subtle highlight.