On this page
- Hair products and tools for a curly half updo
- Before using heat
- How to recreate this half up half down hairstyle: 7 simple steps
- 1. Detangle and divide the hair into layers
- 2. Curl the bottom layer away from your face
- 3. Let the curls cool before separating them
- 4. Work upward through the remaining layers
- 5. Gather the top section and leave the lower curls loose
- 6. Secure and shape the half ponytail
- 7. Arrange the front pieces and check the back
- Adjust this half-up hairstyle for curly or wavy hair
- Choose a half-up hairstyle for school or a special occasion
- Common problems and small fixes
- Follow the half-up hairstyle video tutorial
- Frequently Asked Questions
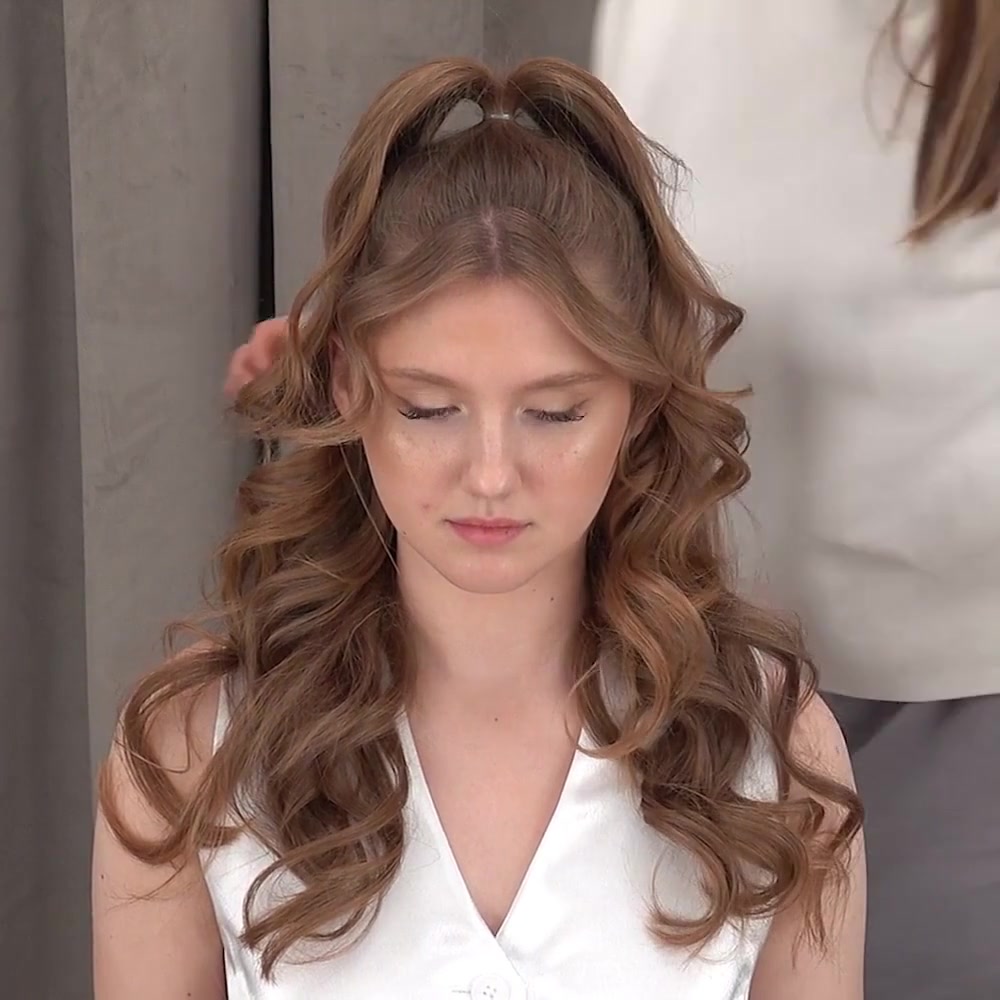
To make half-up curls, curl your hair in small sections, let the curls cool, then gather the upper section into a ponytail while leaving the lower lengths loose. Smooth the hair near the roots without brushing out the curled ends. Finish by gently arranging the ponytail and the pieces around your face.
A half-up, half-down hairstyle, also called a half updo, keeps the top secured while the rest of your hair stays loose. Unlike a full updo, it leaves the length and curl pattern visible.
This photo tutorial follows the half-up hairstyle demonstrated in an Oh!Nice SPACE lesson. The look combines a lifted upper ponytail, loose curls, and face-framing pieces. The photos are actual frames from that lesson. The full video is part of our paid course.
Hair products and tools for a curly half updo
- A paddle brush for detangling before curling
- A comb for parting and a wide-tooth comb for gently separating cooled curls
- Sectioning clips
- A curling iron with a clamp, if you are creating curls with heat
- Heat protectant suitable for your hair and tool
- A small hair elastic that holds your upper section comfortably
- Optional light-hold hairspray
Keep your product routine simple. If you already use a leave-in conditioner or hair oil, check its directions before combining it with a heat protectant. Add only what your hair needs; a texturizing spray is optional, not part of the demonstrated method. For naturally curly hair, choose your usual curl-care products rather than adding several new layers of styling product.
Set everything within reach before you start. If you are learning to use a curling iron, ask a parent or another experienced adult to help, especially with the back of your head. You can also practice the sectioning and ponytail steps with the iron unplugged.
Before using heat
Start with fully dry hair: there should be no remaining moisture when you use a standard curling iron. Follow your tool and heat-protectant instructions. The American Academy of Dermatology recommends limiting heat styling, using low or medium heat, and applying a heat protectant. See its tips for healthy hair.
The temperature and holding time shown in one demonstration are not universal settings for every head of hair. Follow the guidance for your tool and hair type, keep the hot barrel away from your scalp, ears, and fingers, and let released curls cool without catching hot hair in your palm. Put the iron on a heat-resistant surface when you set it down.
How to recreate this half up half down hairstyle: 7 simple steps
1. Detangle and divide the hair into layers
Gently brush out tangles before you begin. Start at the ends and work upward rather than pulling through a knot from the roots.
Make a horizontal part around ear level, then clip the upper hair out of the way. Leave the bottom layer loose. Divide that loose layer into left and right sections so it is easier to keep track of the direction you are curling.
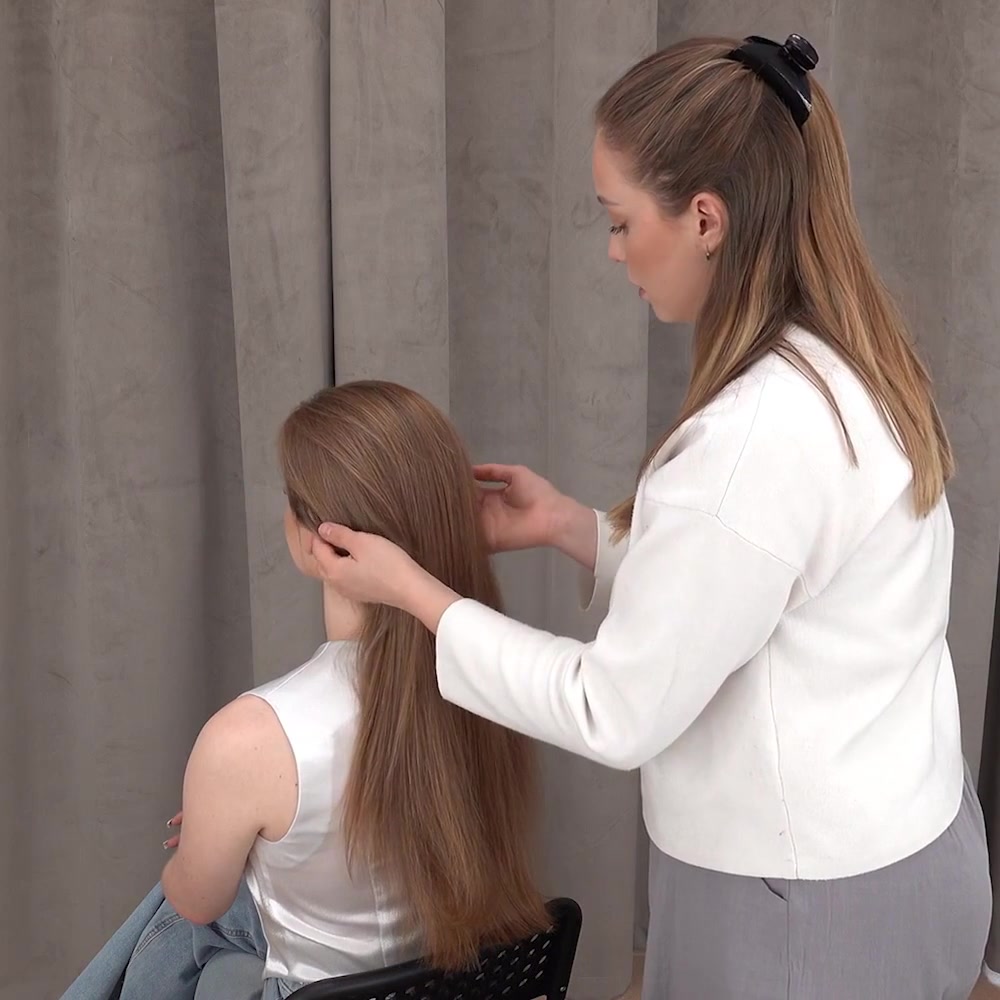
The aim is to expose a manageable layer. You do not need to copy the exact number of strands in the lesson: thicker hair may need more sections, while finer hair may need fewer.
2. Curl the bottom layer away from your face
Take one small, detangled section. In the lesson, the instructor wraps the strand flat around the barrel like a ribbon, rather than twisting it into a rope first. Work away from the face on each side; that means the direction changes when you move to the opposite side of the head.
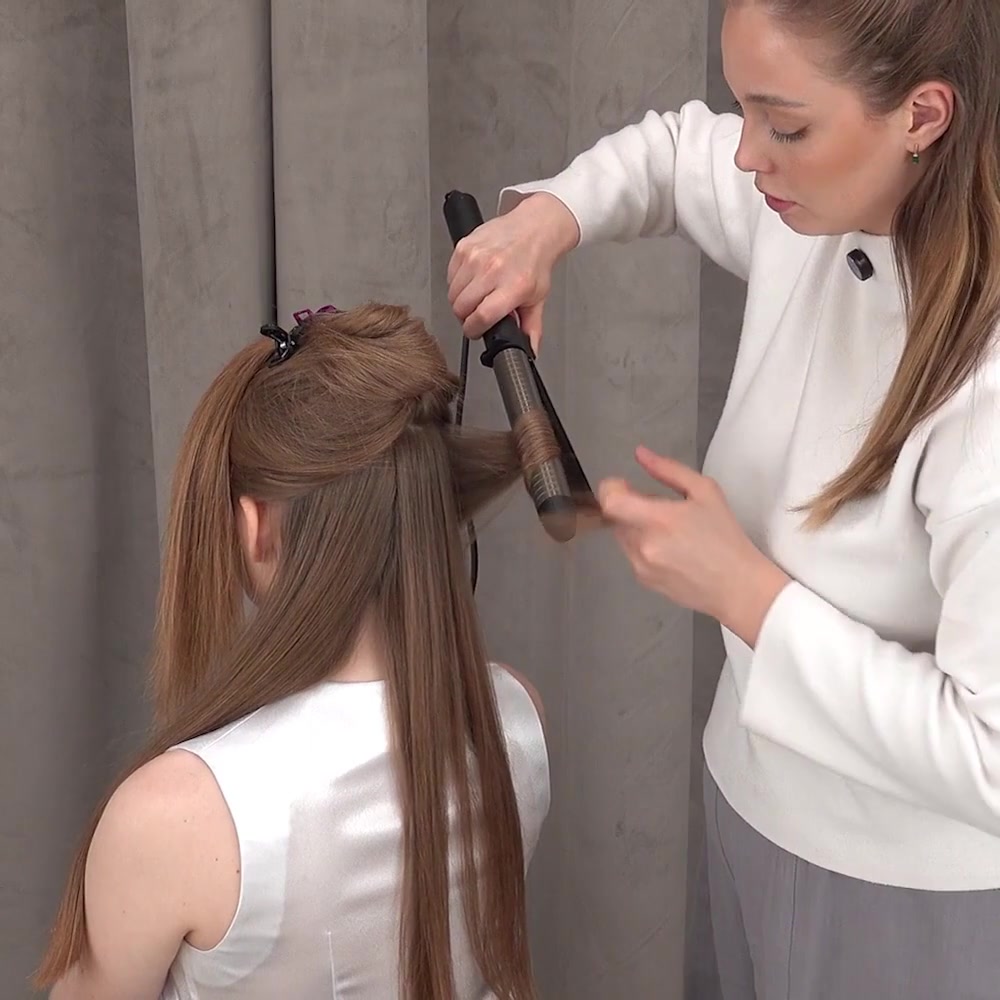
Use your curling iron according to its instructions, then release the strand gently. Avoid tugging downward on the fresh curl. If you cannot comfortably control the iron behind your head, have an adult help instead of trying to copy the instructor’s hand position by feel.
3. Let the curls cool before separating them
Leave each curl alone while it cools. Once the layer is completely cool, gently separate the curls with your fingers or a wide-tooth comb. Begin with a light pass and stop when the curls have the amount of softness you want.
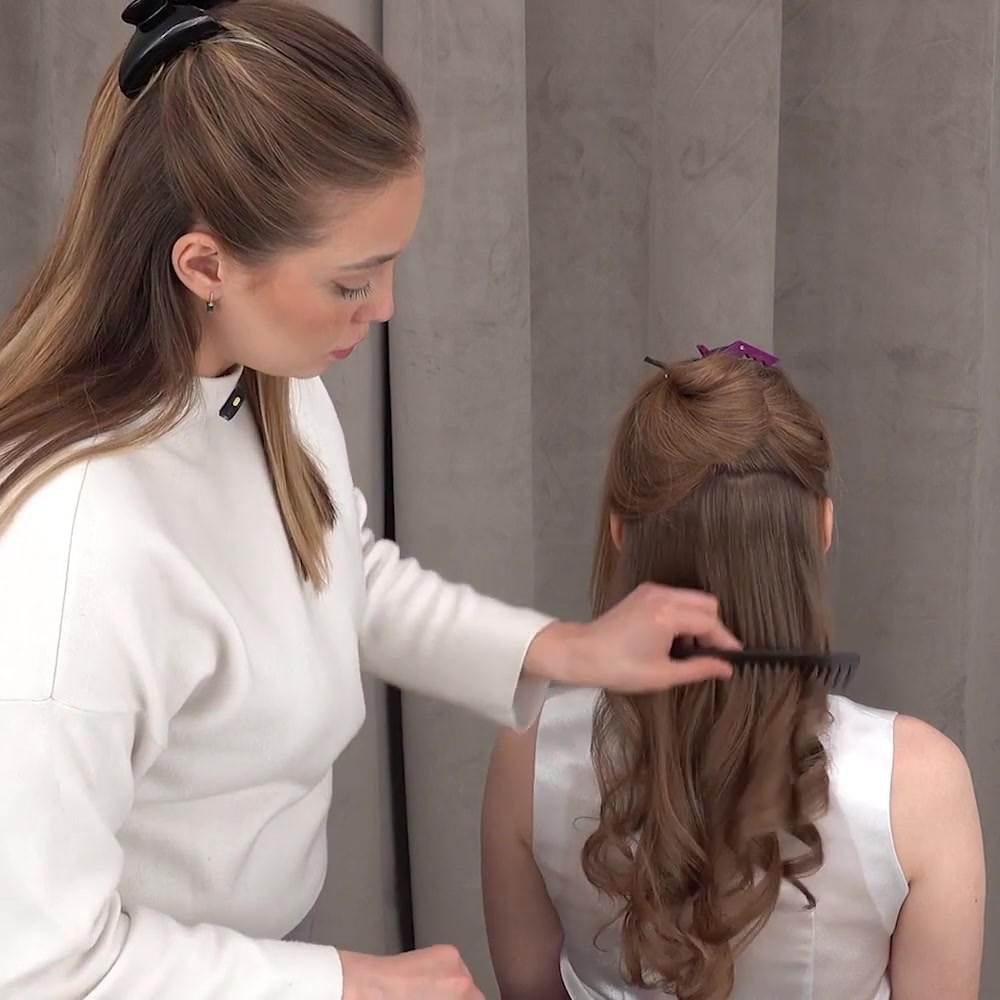
Brushing repeatedly will change the shape, so check the result between passes. If you want more definition, separate less. For a softer finish, ease the curls apart a little more. Optional hairspray can help finish the shape; use it as directed and avoid spraying toward the face.
4. Work upward through the remaining layers
Release the next layer from the clip, leaving the rest secured above it. Repeat the same sequence: detangle, divide into manageable strands, curl away from the face, and let the hair cool.
Continue toward the crown. Near the front, set aside the pieces you want to leave around your face. In the lesson, the instructor separates these from the rest of the upper section before finishing them. You can leave shorter bangs as they are instead of trying to wrap them around a hot tool.
5. Gather the top section and leave the lower curls loose
Once the curls have cooled, use the tops of your ears as a guide for collecting the upper hair. Bring that section toward the back of the crown, leaving the lower lengths down and your chosen front pieces out.
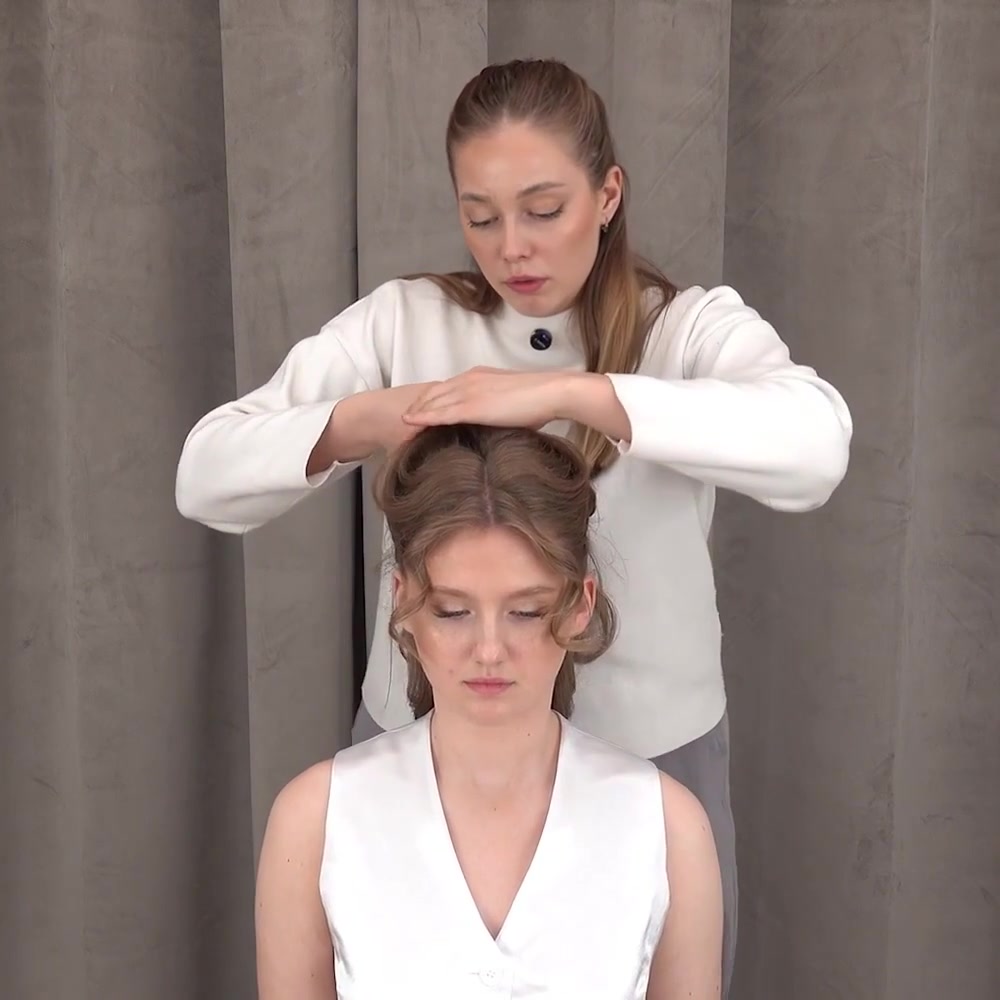
Look at both sides before adding the elastic. If one side seems fuller, adjust the section now. Smooth only the area near the roots and the ponytail base. Brushing all the way through the ends at this stage would undo some of the curl definition you just created.
6. Secure and shape the half ponytail
Hold the gathered hair where you want the ponytail to sit, then secure it with your elastic. The lesson creates a lifted ponytail near the crown. Keep the hold comfortable: it should not pull at your scalp or temples.
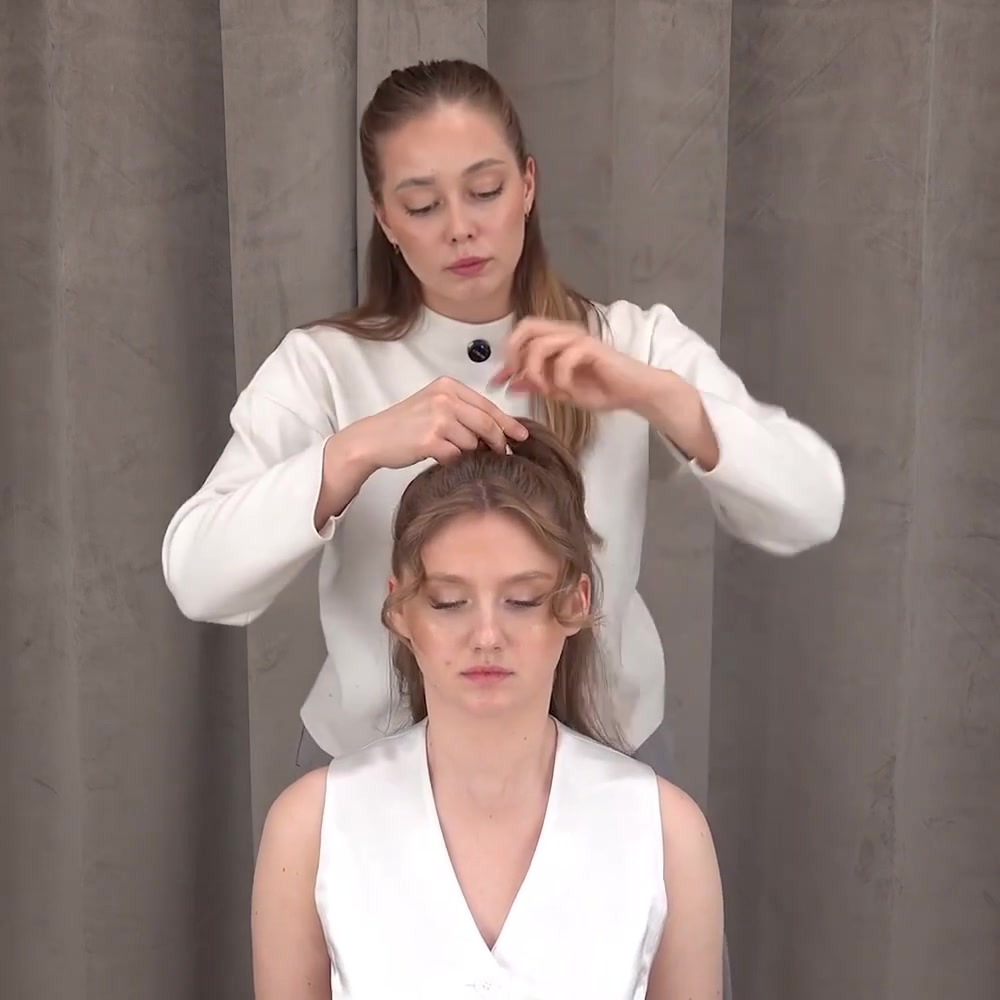
Separate the curled ponytail into two loose portions and arrange them so they spread over the hair below. Use your fingers to adjust their placement instead of pulling the elastic tighter to create height.
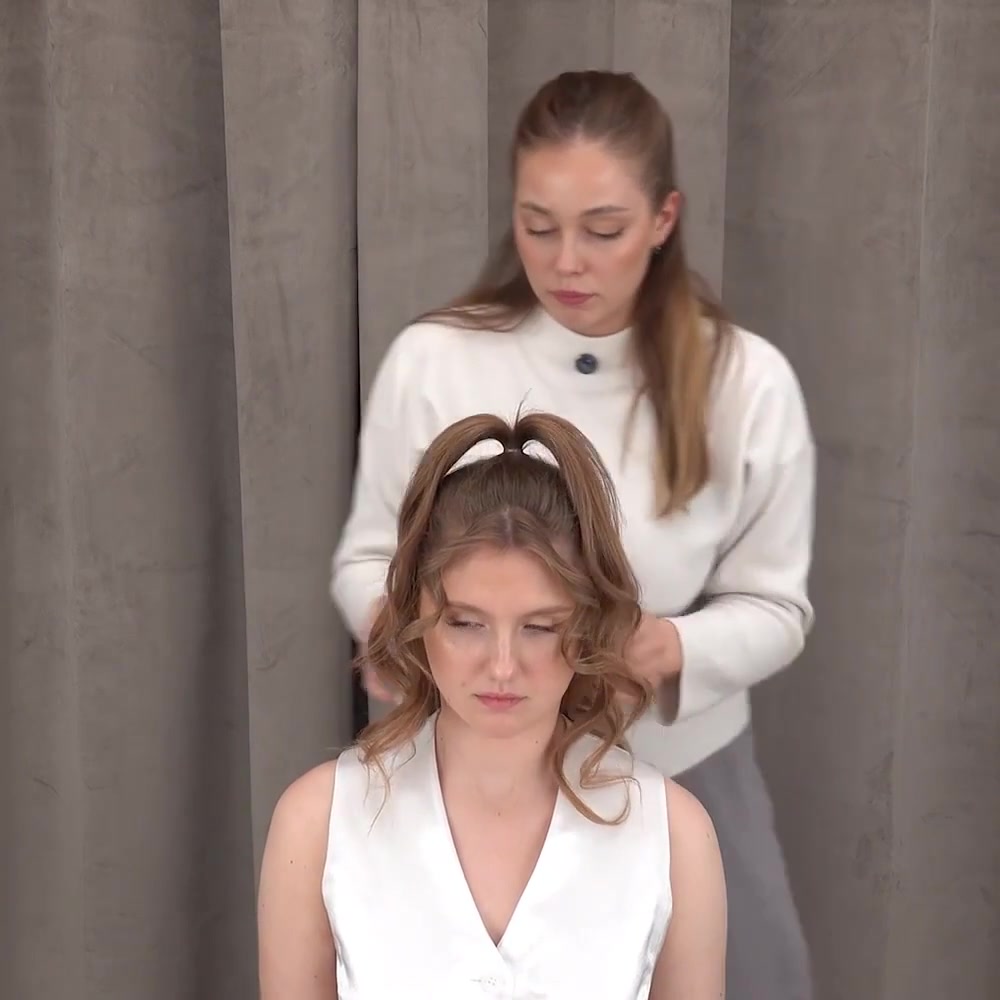
7. Arrange the front pieces and check the back
Gently arrange the face-framing curls. Check the hairstyle from the front, sides, and back with a second mirror or a parent’s help. Make sure no sectioning clips remain hidden in the hair.
If you use hairspray, keep it away from your eyes and follow the label directions. Unplug the curling iron and leave it on a heat-resistant surface to cool. The finished style should feel comfortable when you turn your head.
Adjust this half-up hairstyle for curly or wavy hair
For finer hair: Gather a smaller upper section if taking too much makes the loose lengths look sparse. Use an elastic suited to the amount of hair you are securing.
For thick hair: Work in more layers during curling so you can reach each section. Check that the elastic supports the upper ponytail without excessive pulling.
For shorter layers: Keep pieces that do not reach the ponytail loose around your face. A lower ponytail may be easier to gather than the higher placement in the lesson.
For naturally curly hair: You can skip the curling iron and start with your existing curl pattern. Gather the top gently with your fingers rather than brushing through the lengths. This is an adaptation of the gathering steps, not the heat-styling method shown in the photos.
For wavy hair: Keep your waves for a soft finish and follow the gathering steps. There is no need to turn every wave into a tighter curl to make a half-up style.
For more volume at the crown: Try a slightly higher ponytail placement and spread the curled ends gently. If this pulls at your temples, lower the ponytail again.
These adjustments make it easy to practice the same basic shape with the texture you already have. For more everyday options, browse our easy back-to-school hairstyles.
Choose a half-up hairstyle for school or a special occasion
The lifted ponytail in this tutorial leaves the front pieces loose. You can also wear a lower half ponytail for a softer shape, or add a small decorative clip over the elastic once the base feels secure. A clip adds polish without changing the curling steps. If you use a bobby pin to hold a short piece, place it where it feels comfortable and remove it if it presses against your scalp.
For a school dance or a wedding as a guest, practice the hairstyle before the day so you can check the back and adjust the hold. You can achieve an elegant finish with the same loose curls; elaborate wedding hair accessories are optional.
Braided half updos are another variation. A French braid uses a different gathering technique, so treat it as a separate style rather than a step in this lesson. Keep the ponytail version for your first attempt if you want fewer hand movements to learn.
When you save hairstyle ideas from YouTube or Instagram, look for a clear view of the sectioning and the finished back. Notice whether the creator starts with naturally curly hair or creates curls with heat: that affects which preparation steps you can reuse. The photos here follow one lesson on the same model to make those stages easier to check.
Common problems and small fixes
The top looks uneven. Loosen the elastic and check how much hair you gathered from each side. Reposition the section before tightening it again.
The ponytail hides the curls underneath. Try gathering less hair into the upper section, then spread its curled ends to either side.
The ends look bent. Before your next attempt, practice the wrapping movement with a cool, unplugged iron. Keep the strand flat rather than folding its tip under the clamp as you roll it around the barrel.
The curls look too separated. Once they are completely cool, use your fingers to blend neighboring curls gently. Stop before the texture becomes looser than you want.
The hairstyle feels tight. Redo the ponytail with less tension. Comfort matters more than copying the exact height in a photo.
Follow the half-up hairstyle video tutorial
Want to see the sectioning and hand movements in motion? Our paid Online Hairstyling Course for Teens includes the full Half-Up Hairstyle with Curls video among its 10 lessons. Visit the course page for the current program and access details.
Frequently Asked Questions
Do I curl my hair before or after making the half ponytail?
For the version shown here, curl first. Working through loose layers lets you reach the lower hair before gathering the upper section. Let the curls cool before shaping the ponytail.
What is a half-up hairstyle called?
You may see it called half-up half-down, a half updo, or a half ponytail when it is secured with an elastic. You do not need to gather exactly half your hair. Adjust the upper section to suit your thickness, layers, and the result you want.
Can I make this hairstyle without a curling iron?
Yes. Use your natural curls or already-set heatless curls, then follow the gathering and finishing steps. The texture will differ from the curling-iron result photographed in this tutorial.